Posts

Showing posts with the label My Crafts

My New Project - A Dresser for the Dining Room

Image
My husband just brought home my newest project! I had only seen a fuzzy cell phone picture of it so I wasn't entirely sure what to expect, but it was free for the taking and I had just enough info to know it would fit my space in size, if not color. We are in the process of trying to make our dining room a functional space for both homeschooling and dining and the Ikea dressers we had been using for storage the last four years are falling apart from continued use. This redo has to be done on a frugal budget, so I really couldn't see myself passing up a free dresser! It easily offers enough storage to replace the two plain white, Ikea dressers that are going to either be repurposed, donated, or tossed. Now, we have to figure out what to do with this piece to make it my own. It really is gorgeous and I am thrilled that it has "feet." The rest of our furniture (mostly also from Ikea) all sits flush to the ground, so I am really counting on this piece to break things ...

An Adorable Doily Shirt

Image
Sometimes I surprise myself and actually follow through on a craft idea I find. This month, I took my lead from Disney's Family Fun  magazine (February 2012) and made some adorable doily shirts for some cute girls in my life. Generally speaking, I followed the instructions they shared in the magazine and online , but I didn't need to use nearly as much glue as they suggested. For me, a few well placed dabs was plenty so long as I was careful about dabbing the fabric paint on the shirt. The great thing about this craft is that it was very inexpensive. I used t-shirts and doilies I found at the local Dollar Tree. I did buy the paint and brushes from Jo-ann's. Fortunately they were on sale and I was able to use a 20% off crafting supplies coupon. That means I was able to decorate 3 shirts for less than $12 (including $5 for a 9-pack of brushes). Plus, I have enough paint and doilies to make, oh, 20 more shirts! The pink one above is for Mary to wear with leggings an...

Homemade/Handmade Gift Idea - Hanging Towels

Image
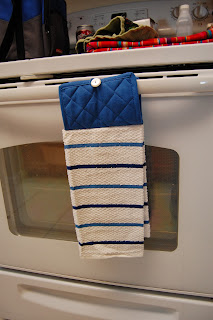
I've wanted to share this homemade gift idea with y'all for weeks! But too many people on my gift-giving list were getting these and I didn't want to spoil the surprise. This gift is great for teachers, people with mobility issues, parents of toddlers, or people who are just too lazy to bend over and pick up a fallen dish towel! Hanging Towel Not only are these gifts useful by anyone with a kitchen, they are also super easy to make. I whipped up a whole stack of them in about 30 minutes. And, if you don't have access to a sewing machine, these can be done by hand if you needed to.  First, start with a coordinating dish towel and pot holder. You need the kind of pot holder that has the loop in the middle. Corner loops will not work for this project. I bought these 5 piece sets at Wal-Mart and was able to get 1-2 gifts out of each set. You can also buy the dish towels and pot holders at dollar stores to save a little more money. I think I spent $6 on this 5-pac...

My New Entryway - Finished!

Image
Don't you just love it when an idea becomes reality? Me too! At the beginning of October, I posted about a possible re-design of my entryway . And over Thanksgiving break, Bruce turned my plan into reality! I am really pleased with the hooks we chose. They match the brushed nickel on the door knob and give a spot for a light back pack and a coat. We used 1x3s for the trim plus bulls-eye corner pieces to add a slightly decorative touch. Our not-so-little secret is that the entire thing is attached to the wall with Liquid Nails. Each piece was attached separately and we have to be careful that nothing really heavy hangs on it. But for our purposes it is absolutely perfect! What's your most recent home improvement project? I'm thinking I'll start working on the kitchen next. Do you have any good, inexpensive ideas for interesting backsplashes?

How to Have A Children's Christmas Card Exchange

Image
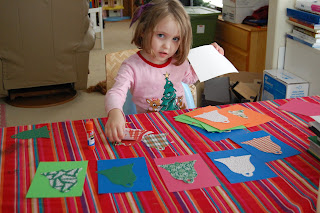
One of our new (as in, we've done this 2 years in a row) Christmas traditions is to have a Christmas card exchange for the littles in our life. It is a wonderful way to guarantee your children receive actual mail and its also another way to focus on others during the busy holiday season.  To set it up, I chose 9 other families with children my daughters knew well and asked them if they'd like to exchange cards. I tried to make sure that all of the families knew each other so no one was sending a card to a stranger. Then, we all posted our addresses and the proper spelling of our kid's names so no one had to dig around for the contact info. For me, a Facebook event was the easiest way to manage the exchange of information. Then, once you've got your participants, it's time to make the cards! Last year, I bought dollar store cards and Charlotte colored or wrote a note inside each one. This year, I wanted them to do something a little more handmade, but on the ap...

Repurposing Sheets & Stained Shirts

Image
I'm a reluctant sewer. I know how to do it, but I just have never put in the practice to get good at it. Sewing a straight stitch is nearly impossible for me at this point. Well, after thinking that I might be ready to give my new serger a spin, I tried staring at it until a sewing project came to mind. I had some white t-shirts with stains on them. They weren't mine though. They belonged to my 2 & 4 year old. I'm not sure why I kept them, but I did. I also had a set of bed sheets I bought for about $2 at a Lighthouse Ministries Thrift Store. I liked the pattern but bought them with no intention other than possibly repurposing them into clothing. There was no plan in my mind, just a love for the light florals and the so soft to the touch fabric. Then today, inspiration hit! I remembered making t-shirt dresses with my mom when I was a kid and I decided to do the same thing for my girls with the stained shirts and sweet looking bed sheets, based on a tutorial at My Cr...

My New Entryway? Maybe? Possibly?

Image
Karissa has great taste. And a great sense of style. She also knows how to make things her own. Take her recently redesigned entryway for example. It is perfectly functional, yet still fits her family's personal style. Here it is, in all of it's simplicity and beauty. And I've decided, if my husband agrees, to copy her idea for my own entryway. The girls need a place for backpacks and jackets (yes, we will at least need light ones for our Florida "winter). And I'd like a place for my purse that has nothing to do with cluttering up the dining room table. Here is my non-artistic, yet functional rendering of  what it might look like if I actually follow through on this home improvement project. This is a longshot of what the whole space looks like. There is a window just to the left of this photo. A medium shot of the door and wall. The brown dots represent the three hooks I'd install. Five hooks would be better, but I can't work around th...

First Fall Art Activity - Handprint Trees

Image
Fall may have arrived according to the calendar, but for those of us in FL, we have to be a little more creative to entice Fall, and cooler temperatures, to arrive. Apart from burning a pumpkin spice candle, I thought a preschooler craft might be in order this week. It might convince Fall that we are serious about its arrival! Last week Charlotte and a friend made handprint trees. They are easy to do if you don't mind getting some paint on your hands and arms. First, find some brown tempera paint. Wait, you don't have brown tempera paint. That's ok. I didn't either. Until Google came to the rescue. And I learned that you can combine the three primary colors (red, yellow, and blue) to make brown. Sounds great. But then, I didn't have any yellow tempera paint. What's a anxious crafter to do?  I improvised.  Orange is made of yellow and red, so combined with blue, I had brown! (This also works with purple and yellow or green and red.) Once yo...

Inexpensive Custom T-shirt Designs

Image
This past weekend we went to the birthday party of a special little friend and I wanted to take a gift that was personalized yet inexpensive. Since I consider myself crafty, I combined a couple of my favorite ideas from around the web with a sale at Michael's and came up with this custom t-shirt for 5-year old Lydia. To begin with, I laid out the shirt (sorry the colors are funky in the next 2 pictures, I took them at night in fake light) and put a piece of cardboard inside to keep the bleach from bleeding through to the back. Then, with a bleach pen (cost was ~$1.40 with coupon), I free handed a random, girly design onto the side of the shirt. After about 15 minutes you can see that the color was already started to leave the shirt. After about an hour, the bleach gel had started to dry out and get crusty so I rinsed it in the sink then dried it. Once it was clean and dry, I used purple embroidery floss to stitch Lydia's name on the front. I did this free hand (I'm ...

Easter Spring Wreath

Image
The majority of the arts and crafts I create are riffs on something I saw somewhere else. My Spring wreath is no exception. While browsing the home arts at a local shop ( The Barn , if you must know) I saw a wire wreath with butterflies floating on it. I really liked it and knew my papercrafting friend Amy (of Dearie Designs ) would be able to help me get my planned replica just right! While discussing wreath forms, we happened across 3 old frames with very old Anne Geddes type pictures in them. Not our style at all. But they were free and would be more interesting than a more traditional round wreath. So we popped the glass and pictures out and contemplated how to cover the frame. I had 2 ideas - twine and ribbon. Then, the twine wrapping commenced. Let's just say that I don't wish this part of the project on anyone. It took me nearly 3 hours (with a few interruptions from the littles) to wrap the entire frame. And I didn't even both with the corners. At the end o...

Monogrammed Canvas

Image
One of the gifts I gave to my daughter's caregivers for Christmas last year was a monogrammed canvas. They are easy to make and you end up with a very personalized gift for not much money. You can choose the colors to match the decor in any room - a dining room, college dorm room, child's room. It is highly versatile. Supplies: 1 8x10 canvas 1 foam brush Bottle of Mod Podge 2 sheets of solid colored 8x11 cardstock for the background 1 sheet of 8x11 cardstock for the monogram (solid or pattered) To begin, tear your background cardstock into large pieces. Be sure to tear every edge because this is not a project that looks good with straight edges. Roughly layout your pieces on top of the canvas to see if you have enough and like the general shape they make. Once you are happy, gently slide them off so you can put them back in about the same way. In your favorite word processing software, type the letter of either the first or last name of the recipient and change it to...